


 Application Information
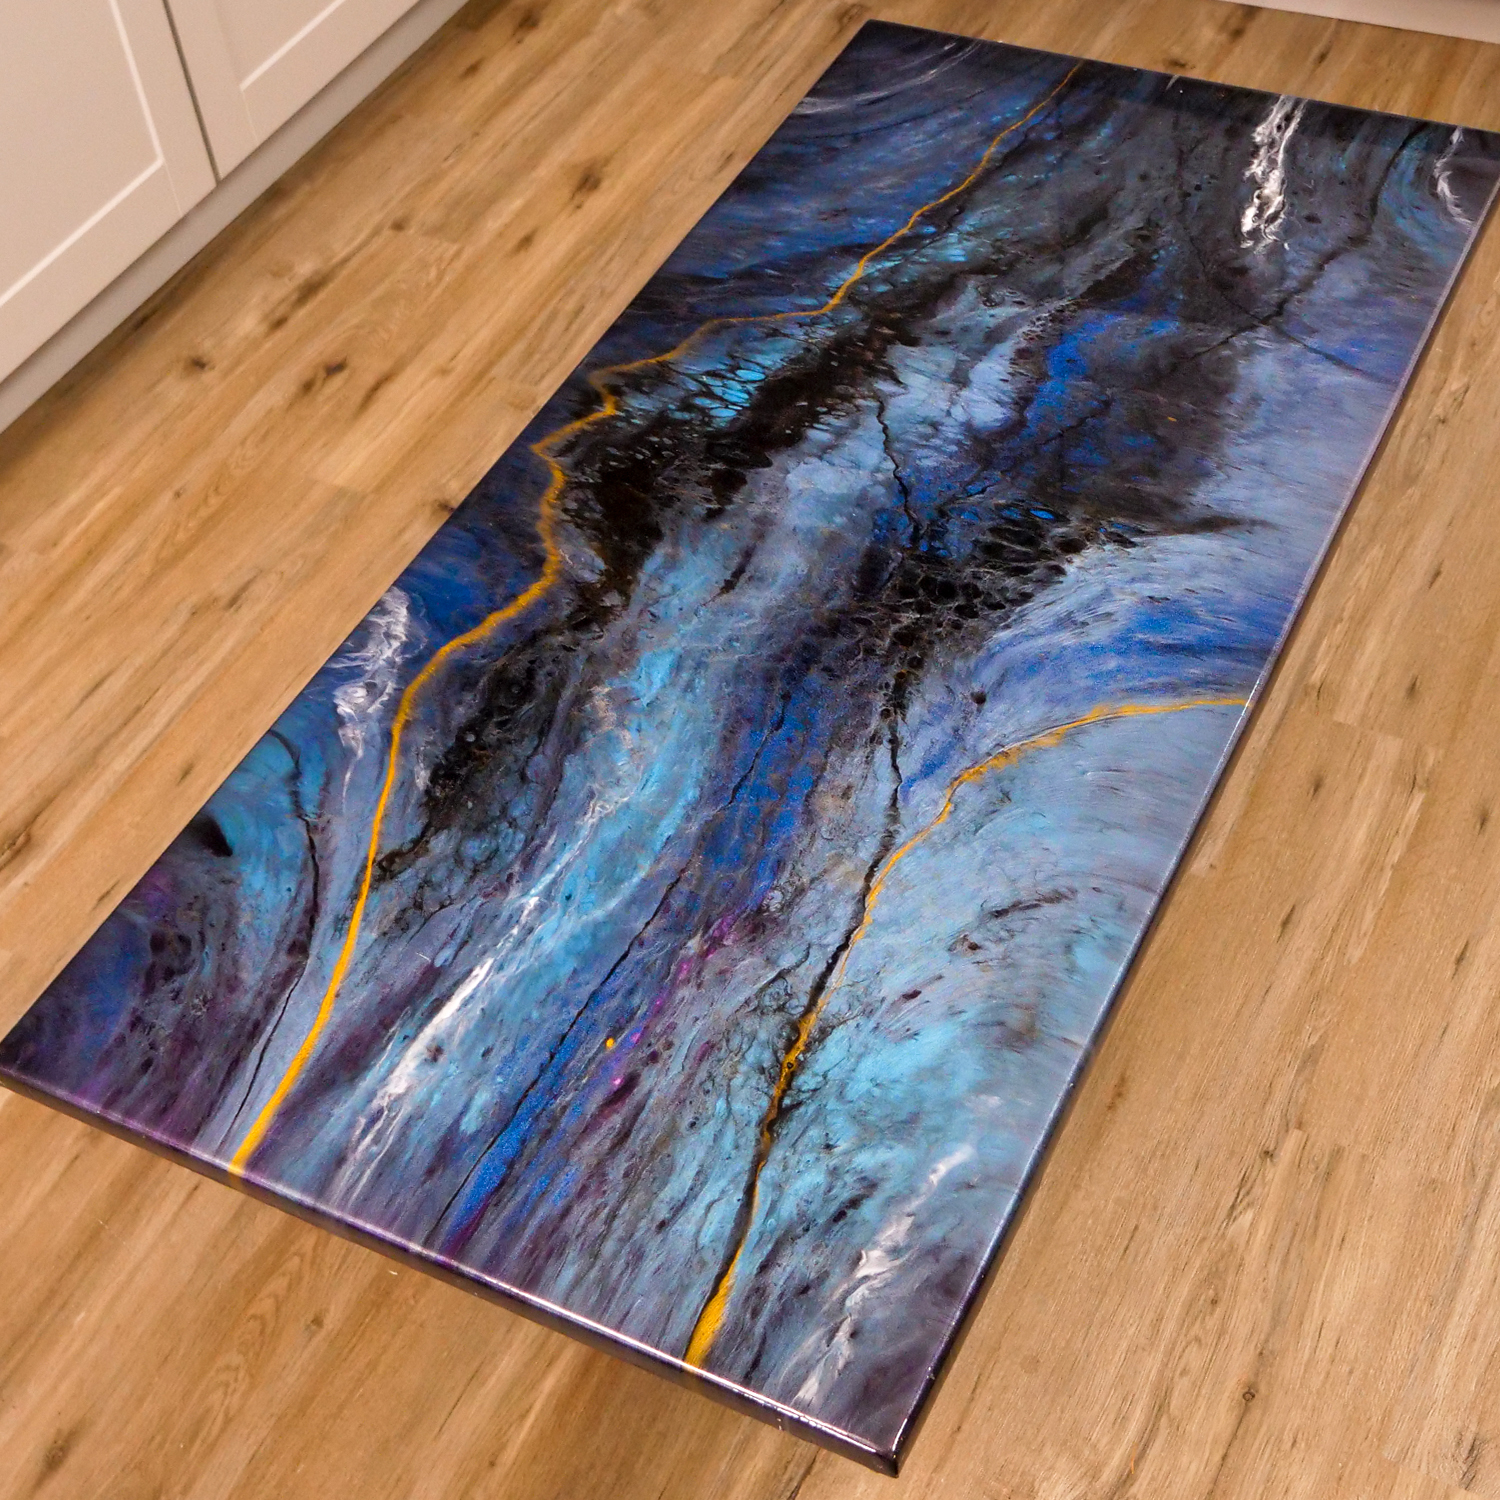
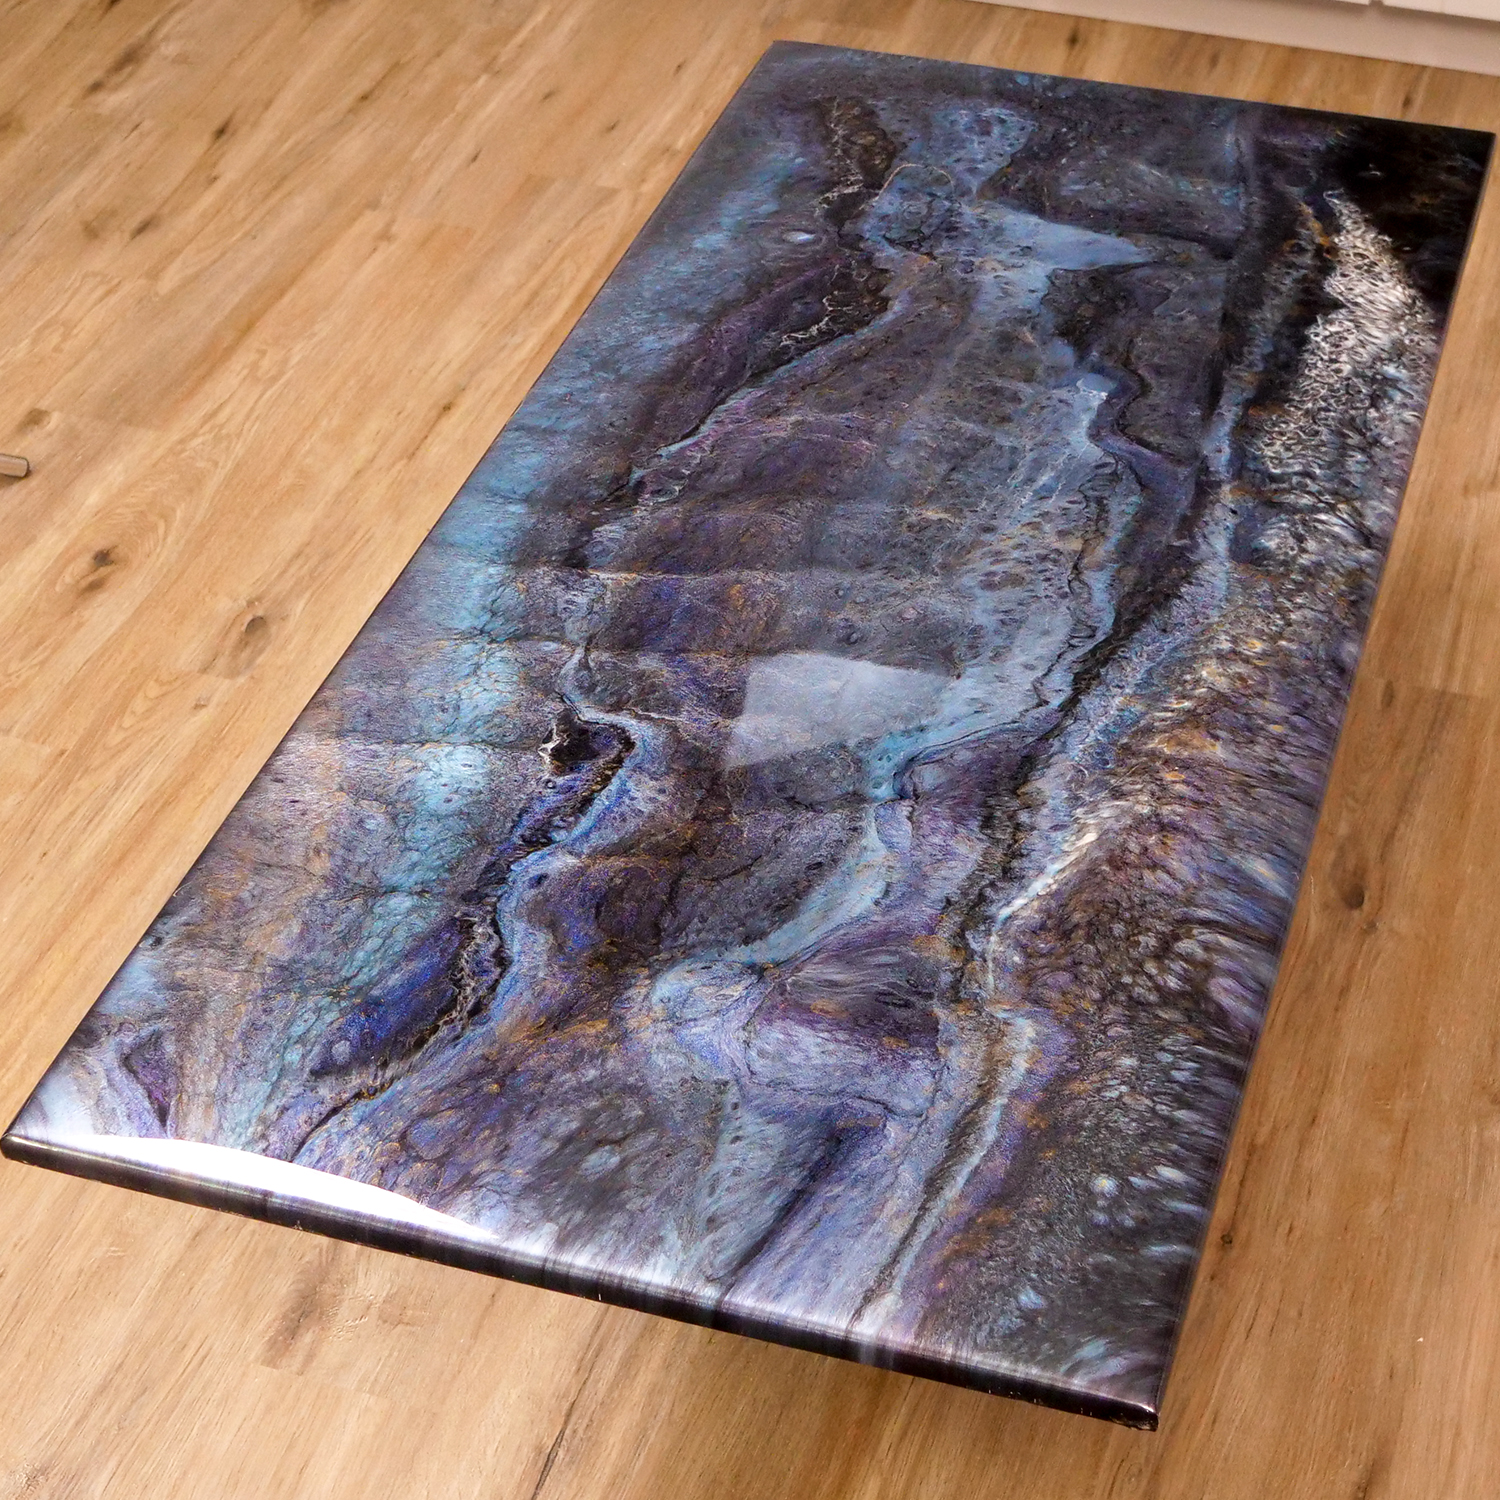


Blue Fractured Granite Epoxy Kit
Product Information
Craft stunning Blue Fractured Granite countertops with the Stone Coat Epoxy Kit, avoiding the high costs and complications of natural granite installation. This kit is tailored for DIY homeowners looking for an affordable yet luxurious countertop transformation. No need for expensive granite yard visits or dealing with late installers. Stone Coat provides all the essentials in one convenient package, complete with user-friendly epoxy and comprehensive video tutorials on our YouTube channel.
Customize your countertop finishes by adjusting the color ratios or by blending metallic powders into the epoxy for added depth and uniqueness. The Blue Fractured Granite Epoxy Kit offers flexibility in design, allowing you to create a personalized look that complements your space.
Kit Coverage Rates:
- 1/2-gallon: Covers 10 square feet
- 1-gallon: Covers 20 square feet
- 2-gallon: Covers 40 square feet
- 4-gallon: Covers 80 square feet
Kit Includes:
- Stone Coat Countertop Epoxy (1/2, 1, 2, or 4 gallons)
- Polycolor pigments: Black, Crater Lake Blue, Blue Earth, Purple Mountain, Violet Pearl, Sky Blue, Gold
- Alumilite Dyes: White, Black
- BLACK Epoxy Undercoat
Embrace the elegance of Blue Fractured Granite with Stone Coat's Epoxy Kit, and transform your countertops into a masterpiece in just a few hours.
*4-gallon kit contains 2 of every color additive and 2 - Epoxy Undercoats - Black
|
Hand Meld Marble Technique: |
Exotic Pour Epoxy Countertop Technique: |
Quick Guide Instructions - Applying Epoxy over Old Countertop
Phase 1: Countertop Prep
Step 1: Clean and degrease countertops with TSP or a heavy duty degreaser. Clean off residue with warm water. Cover floor and cabinets to keep epoxy from getting them sticky!
Step 2: Fill any pits, dings, and existing countertops seams with an all-purpose filler like Bondo. (optional step: Use Sawzall or multitool to remove existing backsplash if applicable. Fill gap with Bondo. Make new backsplash out of 1/2'' or 3/4'' MDF and pour it flat when you pour the countertop. When cured install with silicone. Use silicone where the countertop meets the backsplash and use paintable latex caulking where the backsplash meets the wall.)
Step 3: When all-purpose filler is dry, sand filler back flat and rough up entire countertop with 60-120 grit sandpaper then clean the dust with 91% isopropyl alcohol.
Step 4: Apply 2 - thin coats of our Bonding Primer for slick countertop surfaces (sold separately). The bonding primer creates a chemical bond over non-pours surfaces. Stone Coats Bonding Primer is translucent and will not color the countertop. Allow the bonding primer to dry 2-4 hours before the next step
Step 5: Apply 2 - thin coats of Stone Coats Epoxy Undercoat - Black. Allow the undercoat to dry 1 hour between coats and let the undercoat dry a minimum of 4 hours before the next step - applying the Blue Fractured Granite Kit.
Phase 2: Epoxy Coating - Blue Fractured Granite Epoxy Countertop
HAND MELD MARBLE Technique:
Step 1: Mix Stone Coat Countertop Epoxy at a 1:1 ratio. Measure 3-4 ounces per square foot of countertops. Mix for 2 minutes with a paddle mixer on a drill, or double the mixing time if mixing with a paint stick. Take time to scrape the sides of the bucket midway through mixing. Divide the mixed epoxy into separate mixing cups and add colors provided. Adjusting the ratio of colors used with change the look of the countertop to what style you'd like in your home.
Step 2: Pour ribbons of the color epoxy over the countertop. Randomly apply colors in the flow you'd like. Use your gloved hands with light pressure to meld colors together. The epoxy does the hard work for you. Just guide it with your finger tips until the look desired is achieved. Bring in accent veins of either black or gold for a stunning fractured look.
Step 3: Optional steps for additional depth and stunning natural detail. Use 91% isopropyl alcohol and mist the countertop with larger and smaller size drops of alcohol. This will cell and lace the colors. You can also use a Bondo spreader or Magic Trowel to meld and fracture the hand meld marble countertop finish.
Step 4: Use a heat source to remove air bubbles from the mixed epoxy on the countertop. Sweep the surface with either a propane torch or heat gun. The epoxy will not catch fire. The heat will break the surface tension and pop the micro bubbles. I sweep the surface holding the heat source 1-2 inches from the surface and cover the entire surface of the countertop. I do this a minimum of 3 times when complete with the countertop finish.
Step 5: Allow the epoxy to cure 18-24 hours before the next step. For best results, turn off any air movement and lights. Reflections from lights will attract bugs into the surface, air movement brings in lint and dust into the surface.
Exotic Pour Technique:
Step 1: Apply a tape dam to the perimeter of the countertop project. We are applying 4-5 ounces per square foot with the exotic pour. When applying more than 3 ounce per square foot you need to contain the material on the surface until the product thickens. The extra material moves and melds naturally on the countertop helping the finish to look more realistic and vivid. We leave the tape dam in place 1.5-2 hours after mixing. When we remove the tape the thickened epoxy coats the edges well leaving behind vivid High Definition edges without stretching the finish on the surface.
Step 2: Mix Stone Coat Countertop Epoxy at a 1:1 ratio. Measure 5-6 ounces of epoxy per square foot of countertops. Mix for 2 minutes with a paddle mixer on a drill, or double the mixing time if mixing with a paint stick. Take time to scrape the sides of the bucket midway through mixing. Divide the mixed epoxy into separate mixing cups and add colors provided. Adjusting the ratio of colors used with change the look of the countertop to what style you'd like in your home.
Step 3: Pour the colored epoxy back into the larger mixing bucket randomly. Do not mix the color together in the large bucket. Fill the bucket with the colored epoxy. Pour out the full bucket on to the countertop. Pour it out left to right or front to back. The epoxy will move and meld doing the hard work for you.
Step 4: Optional steps for additional depth and stunning natural detail. Use 91% isopropyl alcohol and mist the countertop with larger and smaller size drops of alcohol. This will cell and lace the colors. You can also use a Bondo spreader or Magic Trowel to meld and fracture the hand meld marble countertop finish.
Step 5: Use a heat source to remove air bubbles from the mixed epoxy on the countertop. Sweep the surface with either a propane torch or heat gun. The epoxy will not catch fire. The heat will break the surface tension and pop the micro bubbles. I sweep the surface holding the heat source 1-2 inches from the surface and cover the entire surface of the countertop. I do this a minimum of 3 times when complete with the countertop finish.
Step 6: Remove the perimeter tape dam 1.5-2 hours after mixing. Use your gloved fingers to pull the epoxy over the edge if needed. Use epoxy from the tape to wet the edges and help the thickened epoxy flow over the edges.
Step 7: Allow the epoxy to cure 18-24 hours before the next step. For best results, turn off any air movement and lights. Reflections from lights will attract bugs into the surface, air movement brings in lint and dust into the surface.
Phase 3: Epoxy Clear Coat
*Applying a clear coat of epoxy will add depth and protection to your functional art countertops and bring them back to being food safe.
Step 1: Lightly sand the cured epoxy if retuning for the next step after 24 hours. Clean the dust off with 91% isopropyl alcohol.
Step 2: Mix Stone Coat Countertop Epoxy at a 1:1 ratio. Measure 3 ounces per square foot of countertops. Mix for 2 minutes with a paddle mixer on a drill, or double the mixing time if mixing with a paint stick. Take time to scrape the sides of the bucket midway through mixing.
Step 3: Pour clear mixed epoxy into the center of your countertop. Before spreading with Stone Coats 1/8'' x 1/8'' square notch trowel, use the trowel to mix the puddle of epoxy an additional time. Use the trowel to evenly spread the material over the surface of the countertop. As a final step use the trowel to let the epoxy roll over any edges. Use your gloved hands to smooth the epoxy on the edges.
Step 4: Use Stone Coat Chop Brush or your gloved hands to chop the top. This will remove any faint trowel lines and mix the material on the surface 1 final time.
Step 5: Use a heat source to remove air bubbles from the mixed epoxy on the countertop. Sweep the surface with either a propane torch or heat gun. The epoxy will not catch fire. The heat will break the surface tension and pop the micro bubbles. I sweep the surface holding the heat source 1-2 inches from the surface and cover the entire surface of the countertop. I do this a minimum of 3 times when complete with the countertop finish.
Step 6: Allow the epoxy to cure 18-24 hours before the next step. For best results, turn off any air movement and lights. Reflections from lights will attract bugs into the surface, air movement brings in lint and dust into the surface.
Phase 4: Optional Step - Ultimate Top Coat (sold separately)
*Max durability, food safe. UTC comes in two different sheen levels. Matte & Gloss/Satin
Ultimate Top Coat - Natural Matte Finish:
Achieve a stunning matte or satin finish on your countertops with our natural finish Ultimate Top Coat. Designed to mimic the luxurious feel of leathered granite, this top coat reflects less light, enhancing the visibility of the epoxy finish while providing essential protection against micro scratching and wear.
For optimal results in your kitchen or bathroom project, we recommend applying the Ultimate Top Coat to a practice board, following the mixing instructions provided below. Remember, practice makes perfect!
Ultimate Top Coat - Glossy Finish:
Get the ultimate protection for your countertops with the glossy Ultimate Top Coat. This high gloss finish provides the same level of protection as a natural finish, but with an added touch of elegance. Its subtle texture sets it apart from the smooth appearance of epoxy's clear coat, enhancing scratch resistance and safeguarding against damage from heavy kitchen items. Follow the mixing and thinning instructions below to achieve a durable countertop with minimal texture. Upgrade your countertops today!
Application Instructions:
Coverage: 50 square feet
Mixing Ratio: 2:1
Dry Time: 8-9 hours
Ready For Use: 24 hours
100% FOOD SAFE - FDA APPROVED FOR FOOD CONTACT
*Do not use a sprayer to apply the Ultimate Top Coat*
Epoxy Surface Preparation:
Allow fresh epoxy to cure 24 hours before sanding the surface and edges with 220 grit sandpaper. When applying the natural finish for best results use a random orbital sander and sand the clear coat of epoxy until a matte finish is achieved. (Sand with 320 grit for Gloss Finish) Clean the dust off with 91% isopropyl alcohol and let fully dry. Pro Tip: The cleaner the surface before applying the UTC the better the finish will be, take time to remove all dust from the countertop before rolling out the UTC. Use contactor masking tape to remove the lint from the 1/4'' roller covers. Roll the rollers across the tape until all lint is removed. before mixing the material. For a 40 square foot kitchen prepare 2 rollers to apply the material wet and 4 rollers to dry roll and remove excess material.
Tool's Needed:
2-3 Paint Roller Frames
4-6 1/4'' nap microfiber rollers 6''-9'' long rollers
1 - Paint Roller Pan
Tape to de-shed roller covers
Mixing Stick
Rubber Gloves
Mixing Instructions:
Natural Matte Finish - Multiply the project square footage by .275 to determine how much Ultimate Top Coat to mix. Multiply the amount of UTC needed for the project by .16 to determine the amount of room temperature water to add to the UTC after mixing. Measure and mix the material with a flat bottom paint stick at a 2:1 ratio in a mixing cup for 45-60 seconds. Add in the room temperature water and mix again until a consistent mixture is achieved.
Gloss Finish - Multiply the project square footage by .275 to determine how much Ultimate Top Coat to mix. Multiply the amount of UTC needed for the project by .5 to determine the amount of room temperature water to add to the UTC after mixing. Measure and mix the material with a flat bottom paint stick at a 2:1 ratio in a mixing cup for 45-60 seconds. Add in the room temperature water and mix again until a consistent mixture is achieved.
Application Instructions:
Pour mixed Ultimate Top Coat into a paint pan. Use a de-linted 1/4'' nap microfiber roller to apply the material over the project one piece at a time. Make sure to apply material over the entire surface then any edge. Take time to get the material as even as possible as you apply the UTC wet before switching to the dry roller to remove excess material using light pressure. Feather out high point lap lines with the wet roller 1st. Switch to a fresh clean dry roller and with light pressure and in one direction remove excess material. When the dry roller start to make a sticky noise switch to a new dry roller. The material goes on milky white and will dry clear. Pro Tip: Keep from over dry rolling. As the material sets up, if you go back to it and try and dry roll more the texture will stipple and stand up. Faint lap lines will disappear, so don't fret when you see subtle lap line in the milky material. The Ultimate Top Coat will be dry to the touch in 8-10 hours and ready for light use in 24-48 hours.
Transform Your Space with the Blue Fractured Granite Epoxy Kit ?
Revitalize Your Countertops: Ready to breathe new life into your kitchen or workshop? Our Blue Fractured Granite Epoxy Kit is your perfect partner. Whether you're renewing worn-out countertops or crafting a new masterpiece from wood, this kit brings a touch of luxury and durability to your space.
Vibrant Colors and Unique Designs: Unleash your creativity with our selection of stunning colors - Black, Crater Lake Blue, Blue Earth, Purple Mountain, Violet Pearl, Sky Blue, and Gold. Plus, with White and Black Alumilite Dyes, the possibilities are endless! Create your own bespoke, eye-catching designs that reflect your style.
DIY-Friendly, Professional Results: You don't need to be a pro to achieve professional-looking results. Our easy-to-follow instructions guide you through each step. From preparing your old countertops to applying the stunning epoxy finish, we've got you covered. Plus, our kit includes a Black Epoxy Undercoat to ensure a flawless base for your design.
Durable and Long-Lasting: Our Stone Coat Countertop Epoxy isn’t just about looks; it's tough too! Resistant to scratches, heat, and everyday wear and tear, it's ideal for kitchens, bathrooms, and workshops. Keep your surfaces looking pristine for years to come.
Safe for You and Your Family: Safety is paramount in any home project. Our epoxy is food safe once cured, making it ideal for kitchen countertops. Create a space where you can cook, dine, and entertain without a worry.
Two Techniques for Customization: Choose between the Hand Meld Marble Technique for a classic, elegant look, or the Exotic Pour Technique for a more vivid, organic pattern. Each method is simple yet effective, allowing you to achieve a professional-grade finish.
Kit Contents:
- Stone Coat Countertop Epoxy (choose your size)
- 7 Polycolor Pigments (15 grams each)
- 2 Alumilite Dyes (White and Black)
- 1 Black Epoxy Undercoat
Included Guides:
- Quick Guide for Applying Epoxy on Old Countertops
- Detailed Instructions for Hand Meld Marble and Exotic Pour Techniques
- Clear Coat Application for Added Depth and Protection
- Optional Ultimate Top Coat for Matte or Glossy Finish
Your Dream Countertops Await! Transform your countertops into a stunning centerpiece that captivates and inspires. Whether you're refurbishing an old space or creating something new, the Blue Fractured Granite Epoxy Kit is your key to a breathtaking transformation.
At Stone Coat, we go the extra mile for our customers. Our goal is to make it easy for do-it-yourselfers to quickly transform their home with stunning epoxy countertops made from simple yet durable materials. We don't just provide the tools - we give step-by-step guidance through our YouTube channel so you can create beautiful custom designs that are sure to wow your friends and family. With Stone Coat, you won't have to worry about sticker shock or long wait times – get started on your dream countertop project now!
Technical Specs
Video Resources
-
Product Highlight


