
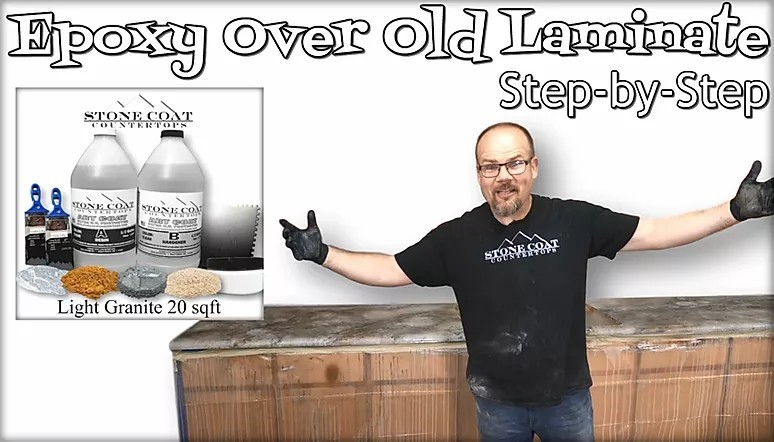
How to Apply Epoxy Over Laminate Countertops
Posted by hailey@epoxi.com BigCommerce on Apr 25th 2024
DIY Countertops | Learn How to Put Epoxy Over Laminate Countertops - Stone Coat Countertops
Learn how to apply epoxy over laminate countertops with this DIY countertop project recipe from Stone Coat Countertops. Get step-by-step instructions and tips.
Project Recipe
- Stone Coat Countertops Art Coat Epoxy
- XIM Advanced Technology Urethane Modified Acrylic Primer
- Alumilite White Epoxy Dye
- Stone Coat Metallic Pigment Powder in Diamond Dust
- Stone Coat Metallic Pigment Powder in Pearl
- Stone Coat Metallic Pigment Powder in Silver
- Stone Coat Metallic Pigment Powder in Gold
- Rust-oleum Ultra Cover Paint + Primer Black Gloss Spray Paint
- Rust-oleum Metallic Antique Brass Spray Paint
- Rust-oleum Gloss White Spray Paint
- 91% isopropyl alcohol
- Polyester putty + hardener
- Paint and primer in one (we used a gray tint)
Tools Needed
- Drill, mixing paddle
- Propane, torch head
- Disposable gloves
- Paint sticks, spoons
- Graduated mixing buckets
- Chop brushes
- Sanding backer w/220
- Roll of paper towels
- 3 mil plastic, masking paper, and Masonite board
If you plan on building your own backsplash from scratch, there are some other tools and products you’ll need. These include:
- Caulk backer rod
- MDF (medium-density fiberboard)
- Woodworking router
- Router bits (we use a 1/8-inch one)
- Table saw
- A reciprocating saw, multi-tool, or jamb saw
Step 1: Preparation
It’s important to prep the area you’re going to work on to avoid any issues that may negatively affect your project. This includes removing any hardware like your sink. Before removing the sink, make sure the shut-off valves are working properly by testing both the hot and cold-water sides of your faucet.
Next, you’ll remove the hardware and silicone securing the sink to the countertop. Then, set all the hardware aside to reconnect after the epoxy laminate countertops are finished.
Now we’ll discuss how to keep your surrounding cabinetry safe and sound during this process.
Step 2: Protect Your Cabinets
We recommend using 3 things to cover your space:
- 3 mil plastic
- Masking paper
- Masonite board
Use 3 mil plastic to keep the epoxy drips off of the lower cabinets. You’ll also want to make sure your flooring is covered well to avoid a mess. No one wants to clean up more than necessary, after all! You can do this by applying masking paper and using tape and Masonite board to help hold it in place.
It’s a great idea to tape and cover everything beforehand. Especially if you need to remove existing backsplash because you’ll stir up dust that would mess with how well the tape sticks.
Step 3: Coved Backsplash Removal
To remove your coved backsplash for your DIY countertops, there are three tools you can use. These are a reciprocating saw, a multi-tool, or a jamb saw. The jamb saw is by far the best option and the tool we chose to use in conjunction with a multi-tool.
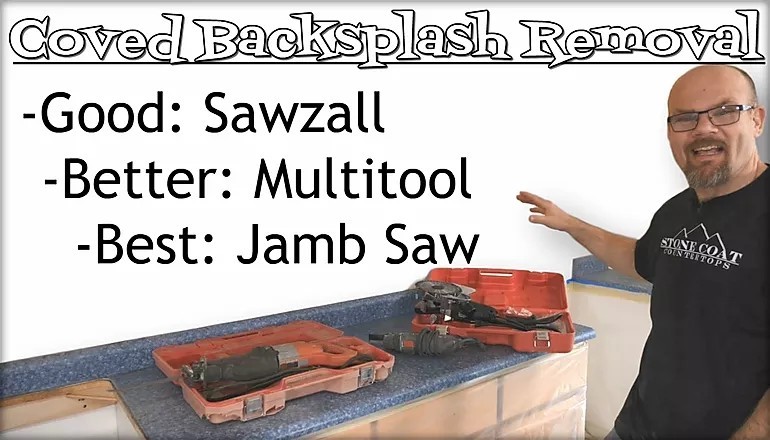
First, set the cutting depth of your jamb saw to the thickness of your backsplash. Then, remove all the coved backsplash. Use a multi-tool to finish the inside 90-degree cut.
Next, install backer rod of the proper thickness into the gap where you just removed the backsplash. Use your fingers or a small pry bar to apply it.
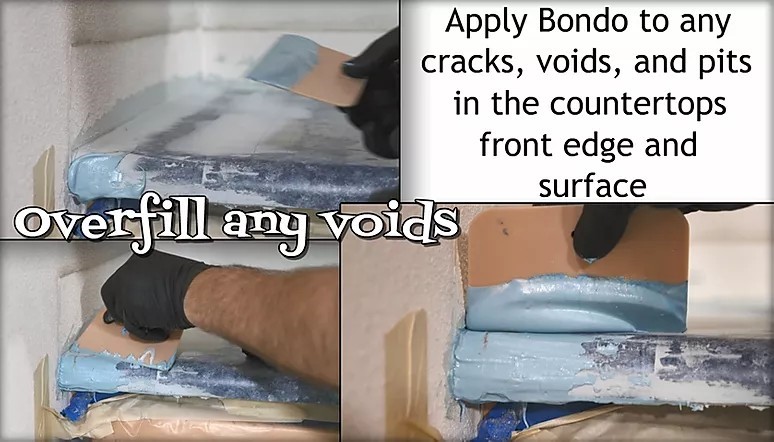
Step 4: Fill in the Gap with Polyester Putty
Before working with any of the products, especially epoxy, we recommend putting on gloves!
For this step, you’re going to mix polyester and its hardener in small batches and fill the gap where the backsplash you remove the backsplash and the backer rod now sits. First, mix the putty and hardener to a consistent color. Then, apply it with a flexible spreader. You should apply it to any cracks, voids, and pits in the countertop’s front edge and surface.
Next, start with 60-grit sandpaper for quick polyester putty bit removal. Make sure you have your respirator, ear protection, and eye protection on for this step. Sand the putty back down to be flush with the countertop surface. Then, sand the entire surface with 60-grit sandpaper.
Step 5: Clean with All-Purpose Degreaser
Clean the entire countertop with an all-purpose degreaser to remove grease and grime. Then, you’ll prepare to use bonding primer.
Sand the surface one last time to help create a strong mechanical bond. Clean up any dust and wipe down the plastic to keep the debris to a minimum.
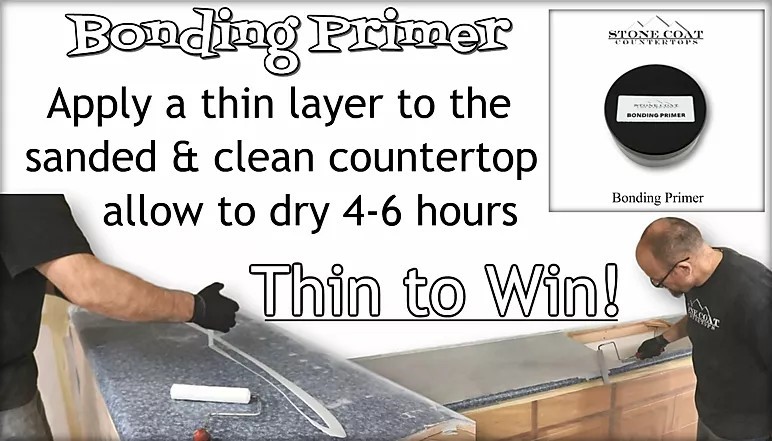
Apply a thin layer of bonding primer to the sanded and clean countertops. Then, allow it to dry for 4 to 6 hours.
You’ll want to sand this bonding primer layer, remove the dust, then do two coats of a paint and primer in one. Since our base will be a lighter color, we chose gray for our paint and primer. Make sure you do one layer at a time and let it dry in between!
Step 6: Build Your Backsplash
Measure to determine how much backsplash you need to create. You’ll want to build your new backsplash tall enough to cover any previous paint lines for a clean installation. Next, cut and router your backsplash. We use MDF (medium-density fiberboard) and a ⅛-inch router bit for our backsplash.
Apply bonding primer and two coats of paint and primer in one. Sand between coats with 220-grit sandpaper and let the paint fully dry before applying the epoxy.
Step 7: Organize Your Workspace
Gather all your epoxy additives and lay out the backsplash so that it can be easily coated with epoxy.
Step 8: Mix Up Your Epoxy

Mix up the Stone Coat Countertops Art Coat Epoxy using your mixing drill attachment and keep in mind you’ll want to use 3 ounces of it per square foot of your project. When you go to add your Alumilite White dye, start out with a little and adjust accordingly.
Mix this for two minutes and make sure you scrape the sides and bottom of your container while mixing slowly to pull in any epoxy sticking to them. Then mix at a slightly faster speed to thoroughly incorporate everything.
When you’re working on larger projects, it’s okay to combine your epoxy in batches. For this project, we mix two quarts at a time, pour and spread out that section, and then chop any seam lines we see with a brush. No one will ever know that you didn’t do it all at once!
Next, pour out the mixture in the center of your project’s surface. Evenly spread the epoxy with a 1/8-inch by 1/8-inch square notch trowel.
Another great tip to consider is using paper towel to wipe down your gloves while you pour epoxy so that you don’t get epoxy on all of your tools.
Step 9: Chop the Top
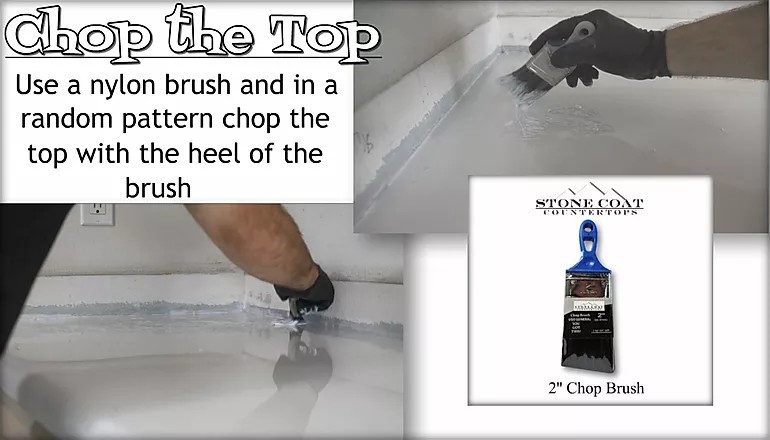
Be sure to pull any loose bristles from you brush free, otherwise they make sneak out later. Prime you brush and use the heel of it to “chop” or dab the wet epoxy in a random pattern. The process of chopping breaks any surface tension and allow the epoxy to flow evenly into all areas. Trowel and chop the backsplash and use your brush to even out the epoxy and any edges where it has dripped.
Step 10: Torch & Mist
Start by using a propane torch to help remove any air incorporated by the mixing and chopping of the epoxy.
Now it’s time to add more color to your DIY countertops!
One of the first colors we’ll use is a combination of 91% isopropyl alcohol and Stone Coat Countertops Silver Metallic Pigment Powder in a spray bottle. The ratio we often use is a ½-bag of pigment powder to 8 ounces of 91% isopropyl alcohol. It helps create a look like veins in natural rock and substrate.
We subsequently spray a mixture of isopropyl alcohol and Stone Coat Countertops Gold Metallic Pigment Powder on top. If there’s any surface tension created by the alcohol and metallic pigment mixtures, that’s a pretty normal thing! You can break that surface tension with your gloved finger to help it level out.
Next, we layer some black spray paint with some isopropyl and Stone Coat Countertops Pearl Metallic Pigment Powder combo. You can be fairly liberal with the black spray paint because you need it to stick and coagulate. These layers serve to create realistic depth to the pattern in your countertops.
We also highlight a few more areas with the Antique Brass Rust-oleum and, finally, sprinkle some Stone Coat Countertops Diamond Dust Metallic Pigment Powder overtop to get a really neat effect.
In the end, the colors we chose are only some of the many options you can turn to for your countertop pattern. Feel free to take these techniques and mix and match colors based on the look you’d like to go for.

Let it all dry for 24 hours and then lightly sand with 220-grit sandpaper. This will help make the bond with the next layer stronger.
Step 11: Plastic Bag Granite Technique
Apply spray paint to a crumpled plastic bag, then tap the bag randomly to your project to create realistic hard lines like those found in granite. We start with black and white and then throw in some of the Antique Brass. Again, feel free to layer your colors how you’d like! Use the same plastic bag technique with some acetone to remove spots that you don’t like and help blend the colors more naturally together.

Order Spray Paint for Countertops
Now we’re going to do a final layer of epoxy. Use 3 ounces of epoxy per 1 square foot of space. Spread it with the same square notch trowel, chop it with your nylon brush, and then torch it to get rid of bubbles.
After you’ve applied your final coat of clear epoxy, you can use a chop brush on your edges to minimize runs and drips.
This coloring technique can be used on both the countertop surface and backsplash surface, which will help them match.
Step 12: Scrape the Drips
Before you scrape any of the epoxy drips, give the epoxy time to gel first. We recommend around 3 to 4 hours. After it’s gelled, use your trowel to remove those epoxy drips. If there’s any debris such as bugs or chop brush bristles in the curing epoxy, you can easily use an old toothbrush to remove them. It’s a simple, but effective, solution!

Step 13: Backsplash Drip Removal
Whether you made your own backsplash or are going over existing backsplash, you’ll want to sand the cured drips of resin for a nice snug fit. If you made the backsplash, you can also use a table saw to remove a ⅛-inch section from the bottom of it to create a flat edge that will sit on the countertops perfectly.
Step 14: Clean Up & Enjoy
If you made your own backsplash, now is the time to install it. Otherwise, peel the tape and remove the plastic protecting your cabinetry.
Lastly, sweep and vacuum the floor and you’re free to enjoy your new DIY countertops! We hope you enjoy that new custom look you created with your own hands!